

Factory Subaru Impreza Cruise Control Installation
![]()
Project Summary:
| Difficulty Level (1-5) | 3 - intermediate |
| Time Required | 3-5 hours |
| Cost | Under $100 total |
| Recommendation | Highly recommended for serious highway driving |
This installation will add a factory cruise control to a 1997 Impreza Outback
Sport, but should also apply to any model Impreza.
The instructions that come with the kit are complete and thorough, but the
illustrations are line-art drawings that don't provide nearly enough cues about where
things are precisely located on the car. Therefore, I will only show pictures and mention tips that are not so obvious.
I believe the instructions are meant for the mechanics at the car dealers to
install the kit as a dealer option, but they are detailed enough for anyone
who's installed car alarms or stereos before.
Note that the pictures were taken the after the fact; I did the whole
installation at night. It was in the apartment complex parking lot with the help of a
Coleman propane camping lantern and a three D-cell Maglite.
Materials Required:
- 1 Subaru Impreza cruise control kit (from Teague's Auto)
- Silicone grease (optional)
Tools Required:
- Philips screwdriver
Torx #T30 bit - 10mm, 12mm, and 14mm socket (ratchet) wrenches
Xacto or other sharp utility knife - Pliers (optional)
- Small flat-blade screwdriver (optional)
Let's Start
| Disconnect the negative terminal from the battery. Wrap the cable in
a rag to prevent any shorts. This is important to avoid accidentally
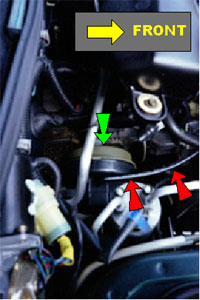
setting off the air bag! The first item to be installed is the vacuum-driven actuator. It bolts onto the right-hand side strut tower, so the big intake box must be removed to get to the mounting area. The actuator also needs to be pre-assembled with a couple of brackets, and it took a few tries to get the orientations right (they only go together one way, though). In this picture, the green arrow points to the actuator, while the red arrows point to the vacuum line. The pre-wired actuator wire harness is taped up to another wire harness next to the firewall. Here's where the Where's Waldo game begins. Connect the wire harness to the actuator once it has been found. |
 |
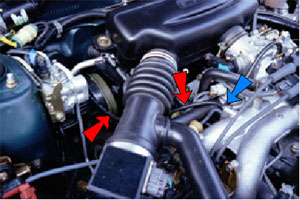 |
The vacuum line (red arrows) will be connected to the intake manifold. Unfortunately, the plug (blue arrow) on the intake manifold is on very tight, and the 7mm square plug end doesn't provide much confidence of leverage to work with. I kept thinking I was either going to break the plug end off or break my 7mm open-end wrench before the thread would loosen. Several whacks on the wrench managed to get the plug loose. |
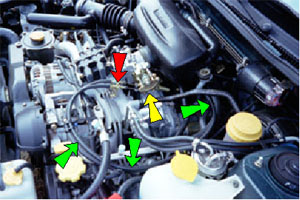
| The actuator cable (green arrows) is threaded behind the engine to hook up
with the throttle cam (yellow arrow). Use the supplied plastic ties and
clips to secure the cable. Adjust the cable at the throttle cam (red
arrow) so
that there's no slack on the cable, but also ensure that the throttle
cam is allowed to return to its full rest position. Apply silicone
grease to the cable and throttle cam, if desired. Replace the air box, and reconnect all air hoses. The engine compartment work is complete. |
 |

|
Next, open up the lower dash panel. Install the cruise control unit (red
arrow). You'll have to dig around to find the pre-wired wire
harness for it, though (green arrow). Another Where's Waldo adventure. The
instructions say it's beside the steering column, but it wasn't
really. Just look for a bulge in one of the wire harnesses wrapped up
in black plastic tape. And be careful about scratching up your hands
while probing around and unwrapping the plastic tape - there's sharp
metal edges all over the place. Reinstall the lower dash panel. |
| Now comes the hardest part. Slide the driver's seat all the way back, or even remove it completely to get to the brake and clutch pedals. It's so tight I couldn't get enough room to take a useful picture of the pedals and switches. There's not much room to work with, and more Where's Waldo games with the wire harnesses. The brake switch will be replaced with one from the kit, and the clutch pedal will get a new switch from the kit. Some patience is needed to get the switches in place and secured with the nuts. Adjust the switches to obtain the desire play in the pedals. |
|
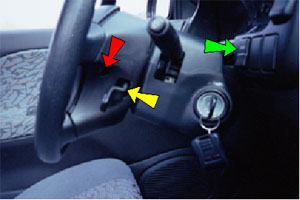
Pull out the dash plug to install the cruise control switch (green
arrow). You may need to use a small flat blade screwdriver to pry out
the plug. Also, it may be necessary to pull out the instrument cluster
panel to get to the connector if you can't see it through the dash
plug hole. Fortunately, the connector was not wrapped up in black
plastic tape. Use the Torx bit to remove the two Torx cap screws holding the air bag assembly in place. The red arrow points to one on the right side; the second is in the same location on the left side. Use a sharp knife to carefully cut out the hole in the plastic for the command switch, and deburr the plastic around the hole edge (yellow arrow). |
| Install the command switch (red arrow) into the steering wheel. Replace the horn cord connector with the one supplied with the kit (green arrow), and connect to the air bag roll connector (blue arrow). I don't know why it's called a roll connector, though. Be careful when removing the original horn connector, as the proper way to remove it is to slide it to the left. Pulling it out towards you may result in breaking the plastic mounting tab. | 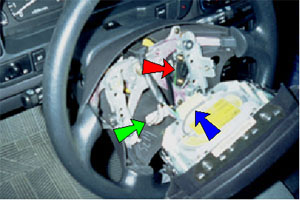
|
 |
Reinstall the air bag/horn assembly, and secure using the
two Torx screws. Reconnect the negative lead to the battery. If you have an alarm, be prepared with the alarm remote to disarm it once power is reconnected. Since the battery power has been off for at least half an hour, the ECU will be reset. Start the car and let idle for a few minutes without touching the accelerator, then turn the ignition off. If the engine starts but dies quickly, one of the intake hoses is probably loose (it happened to me!). If so, reconnect the loose hose, disconnect the battery for another half hour, and repeat the above start procedure. Restart the car and try out the cruise control. |
![]()
| Back to Wayne's Impreza Outback Sport Page | © 2000 Wayne Chin. All rights reserved. | Back to top |