

1997 Impreza Leather Shift Boot and Knob Modification
![]()
Project Summary:
| Difficulty Level (1-5) | 2 - beginner/intermediate |
| Time Required | 1-2 hours |
| Cost | About $100 total |
| Recommendation | Highly, shifts much smoother |
This low-cost modification will replace the rubber shift knob
and rubber shift boot on most pre-1998 Imprezas with a leather
shift boot and leather shift knob. The inspiration for this page
is a leather
shift boot and knob installation on a 1998 RS by Mike Herbst.
Subaru markets the Impreza as having a quick-shifting 5-speed
manual transmission, but I had a feeling the rubber boot hampers
its feel.
I chose to use a 1999 Impreza RS (faux-leather) shift knob
because it was easy to get and conveniently came in black. I
could have gone for a Momo (carbon fiber, aluminum, etc.) shift
knob, but I like the shape of the Subaru design, and didn't want
to mess with set screws either.
I found out the hard way that the 1998-2000 (faux-leather) shift
boots won't work with the pre-1998 Impreza shift boot panel (contact me if you want it to
fit your 1998-2000 rubber boot, $49 unused, unopenend). I had to
get a real leather universal shift boot instead. Since the
pre-1998 models were not designed with a leather shift boot in
mind, there is an unsightly lip on the inside of the shift boot
if it was just left to drape down into the panel. Therefore, a
custom expander was needed to flare out the base of the shift
boot and hide this lip.
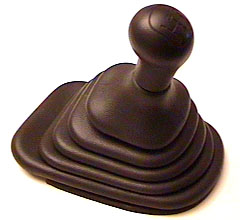 |
The stock setup doesn't quite cut it. It simply looks
too much like an econobox shifter (I know, it is
an econobox shifter). In addition, the heavy rubber exerts too much force during shifting, and often feels like it will pop right out of gear. |
| Side-by-side comparison of the original Impreza rubber shift knob and the '99 Impreza RS shift knob. Surprisingly, the leather shift knob (190 grams) is much heavier than the rubber one (85 grams). | 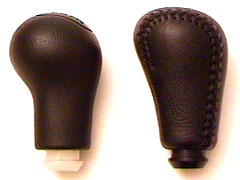 |
Materials Required:
- 1 Subaru or STi leather shift knob (from Teague's Auto)
- 1 Wheelskins or Momo universal leather shift boot, (from Sports Car Accessories)
- 18" RG-58 coax networking cable (from any electronics supply store)
- Piece of duct tape or
- 1" length of 3/8" dia. heat shrink tubing (from any electronics supply store)
Tools Required:
- Philips screwdriver
- Sharp knife
- Awl or leather punch
- Pliers (optional)
- Diagonal cutters (optional)
Let's Start
| Locate the two Philips screws behind the
cupholder tray. Remove and keep in a safe place. Locate
the two Philips screws at the left and right corners just
under the rubber shift boot by carefully prying back the
boot front corners. Remove and keep in a safe place. Unscrew the rubber shift knob. Pop the rubber boot off first, if it'll make it easier to unscrew the knob. Gently pry the boot panel upwards, starting from the rear of the shift boot panel. The rubber boot and the plastic panel that it attaches to should lift off. Take the shift boot assembly off. You will see that the rubber shift boot is attached to the panel with a number of retaining rings. Use the pliers and/or cutters to remove these rings. Be careful that you don't break the plastic posts! The retainers on mine were previously removed, so I don't have a picture of the them. |
| After the retainers are removed (if applicable), detach the rubber boot from the panel. Here is a picture of the rubber boot separated from the plastic panel. The plastic posts on the bottom of the plastic panel are visible, and you can see the holes in the rubber boot that slipped over the posts. The two front posts on this one (red arrows) are already broken. | 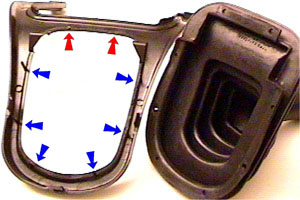 |
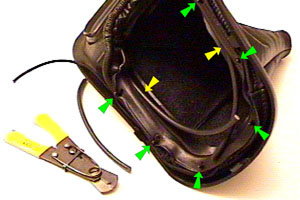
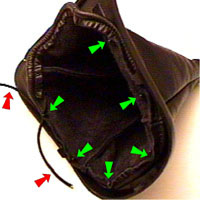 |
Trial fit the new leather boot in the panel. I found
that the Wheelskins universal shift boot to be a fairly
good fit at the extreme bottom. Since there is no
mounting ring, you will need to punch holes in the
leather to slip the leather boot onto the posts. Make
holes just big enough for a friction fit. Carefully slide
the leather boot as far down the posts as possible for a
sug fit. The posts can be seen at the end of the green
arrows. If you have the two front posts intact (not
shown), they should look like the others. Remove the
elastic (red arrows) if desired. Carefully massage the leather boot so that it flares out evenly and symmetrically on the top side of the panel. Re-punch holes in the leather if necessary to obtain a good fit. |
| Using a sharp knife, carefully cut out the bottom rung of the rubber boot. Using the bottom lip as a guide should help. Precision is not crucial, as this part will be hidden inside the leather boot and used as a tensioner/expander. The cutout should not be jagged though, or it may show through the leather. |  |
 |
Carefully tuck the rubber cutout inside the leather
boot, and slip the posts through the holes in the rubber
cutout (green arrows). Again if you have the two front
posts intact (not shown), the rubber cutout should cover
them as well. Massage the leather boot so that it is even around the panel. It's best to have it taut on the rear side (bottom in the picture), so that the slack can be used to work around the mounting holes at the front of the panel (top in the picture). Insert the coax cable (yellow arrows) into the rubber cutout and expand it as much as possible to flare the leather boot out on the top surface. It will act as an expander/tensioner. When the proper length is determined for the coax cable, cut it to length. |
| Use a piece of duct tape or heat shrink tubing to
join the two ends of the coax cable together to form a
ring. I chose duct tape (yellow arrow). Carefully insert
the ring into the rubber cutout. Use a new piece of coax
if it's too short. Finish massaging the leather all around to make the boot even inside and out, and make sure to clear the two front mounting holes (red arrows). Tuck in the elastic if you didn't remove it. |
 |
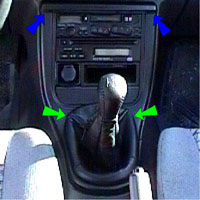 |
Reinstall the new shift boot assembly, being careful
not to snag the boot on the shifter itself or have the
leather boot trim snag on anything. Replace the two screws behind the cup holder tray (blue arrows). Carefully pry back the shift boot corners, one at a time, and replace those screws (green arrows). Massage the boot and custom expander to seat the boot evenly. Carefully slide the top of the leather boot down the shifter, and push the threaded rod portion of the shifter through the top boot opening. Install the new shift knob by screwing it in until it is aligned properly. Adjust the top shift boot opening (by adjusting where in the tapered opening it folds inwards) as necessary to achieve a tight fit onto the lip of the shift knob. |
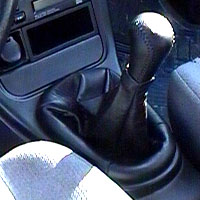
| The shifter looks very tall now, like it went on a
huge diet. Shift feel is much improved over the stock
rubber assembly. I can feel that the shifting is a little
notchier without any rubbery feeling. Seems like a cheaper option than
some short shifters. You can see the rubber cutout as a noticeable outline under the leather. It's possible to trim the rubber cutout even closer to the perimeter to make the lip look thinner, but I prefer it this way. I'm much more concerned with shift feel than looks. |
 |
![]()
| Back to Wayne's Impreza Outback Sport Page | © 2000 Wayne Chin. All rights reserved. | Back to top |